BSV 1172, Chapter 4: Making the Teaser Trailer

.
When I was shooting the doc at the video store, I made a point of getting material for an assortment of promotional materials, including behind-the-scenes footage of the gear being set up (the Canon VC-50 Pro looks especially deadly when a fat telephoto lens is locked onto its front, seemingly screaming to anyone in the environs to ‘Get the hell out of my way!’), some minutia, and a few quick shots of specific scenes being filmed – all of it done solo, which meant bringing filming to a dead stop so I could run around and do some quick set-ups & take quick shots before moving on.
I actually filmed two scenes while I was handing one specific camera – that little Sharp QC-54 – because I thought it would be neat to intercut between the two and create some montages (of which a condensed version is in the teaser). Those particular promo pieces will appear after the film’s completed, and hopefully gotten into some film festivals.
When I initially mapped out the teaser’s structure, I had planned a longer intro, and shot something quite elaborate which follows the history of the media that was at one time carried by Bay Street Video.
The store’s early stock included VHS, CED discs, laserdiscs, Beta, and then DVD and Blu-ray; the intro addressed that media cluster, but it proved too long, so I opted for something leaner and better. I may still have a use for the original intro, but if all else fails it’ll be some bonus material on the DVD release, showing off the really beautiful images one can get from Panasonic’s WV line of prosumer cameras.
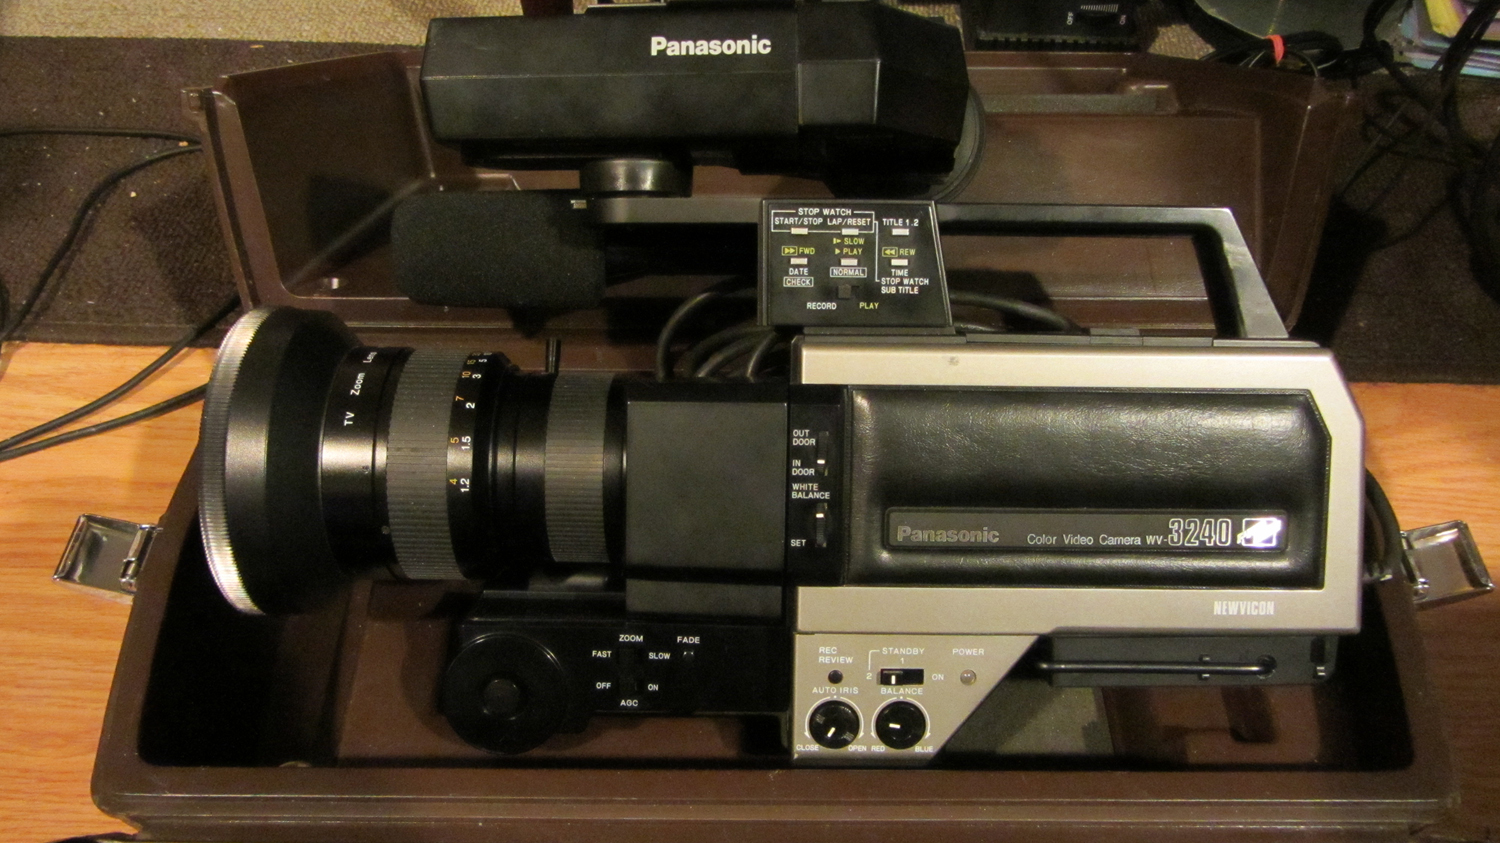
Video cameras in the 70s seemed to be divided into three realms: bare bones black & white models for consumers, B&W and colour for prosumer / industrial use (schools, corporate videos, etc,), and broadcasting (which ideally encompassed studio and street-level ENG cameras).
The 80s cameras were naturally affected by a trickling down of features, since there was clearly an interest by consumers to capture family travels, personal moments, family stuff, and seasonal celebrations on video – a much cheaper alternative than film which had costlier media that offered less recording time, and a waiting period for developing.
Video was immediate, and the early cameras offered straight Record On / Off buttons, but by the early 80s even the cameras came with buttons which allowed one to play back footage from the connected VCR. [Note again: these early cameras required a fat cable to both power them, and send the video signal to a separate VCR which added heft weight to one’s shoulder.] That’s why on Panasonic’s cameras you have Play, Stop, Rewind, Pause, and Fast-Forward / Reverse buttons, not to mention timer / clock / title display, and rudimentary character generators.
The unused intro was filmed with a later model Panasonic camera, the WV-3240, which like the Sharp QC-54, also uses a Newvicon tube like Panasonic’s lower-level consumer models, but it featured a much higher quality lens and imaging system. The colors are more accurate, the focus sharper, and an image that’s much more stable.
.
.
That’s what I used to shoot those globs of light that appear in the teaser’s intro, just to the right of the text. They also appear washed out because I reshot the footage off an HD monitor with a 1982 Sony HVC-2800 Trinicon tube camera.
.

.
The source of those globs are in the aborted intro, and in clear detail. For some of the globs, I used a Video Ventures colour processor box which allowed me to ramp up the colour saturation and get grain which added a peppery texture.
The text was not created in Photoshop, After Effects nor Premiere but something called a Microscript Color Video Titler, made in Canada (!) by Scriptovision Inc., a Montreal-based company that’s long dead. I think they must have made computer components, and figured they could design a low-cost, lightweight, simple character generator [CG], and actually had two models – the Microscript, and the larger Super Miscroscript, which was framed with wood panels and came with a genlock feature.
.

.
The Microscript has a keypad with a non-QWERTY arrangement, plus a shift feature that offers colour blocks, numbers and symbols in an order that only makes sense to a programmer not versed in video post-production. The gizmo does not overlay text onto video; it just outputs the yellow text in one size (more small than medium, really) inside of a red DOS-like colour block over a black background.
.

.
Not exactly ideal for video, but if the text is dumped to the hard drive, resized in Premiere, and overlaid on top of a dark background with the latter’s opacity set to Screen, you have red text superimposed on a dark background of moving video grain.
The red colour and the hairlines from the faint red blocks give it a more retro feel, and because the standard def [SD] text was recorded to MiniDV and dumped to the hard drive, boosting it to 720p doesn’t degrade the text to illegibility. (It also looks better when rendered using the H264 codec rather than a straight .avi file, with more robust colours.)
Later on I’ll have a tutorial on how to use the Microscript, and put up scans of the manual because it’s really a chore to figure out how these work, and to type a coherent block of text. Erasing and navigating back & forth isn’t really so easy, either.
The teaser’s intro was a combination of the text, video snow, spinning blobs of light, and resizing and speed alterations, whereas the film title (“BSV 1172”) that’s nestled between Premiere-generated credits at the teaser’s end was a hand-crafted logo on white paper shot with the WV-3240’s keying feature.
.

.
The feature’s actually designed to let you film hand-written or stencil credits and have them appear as a light colour on a dark background, or the reverse of those. If overlaid on top of video footage with the text set to the Darken mode in the Opacity setting, you get a very retro credit. Copies of the text with different colour settings give you a halo, and offsetting them makes the final credit look even more ‘hand-crafted.’
Nothing complex, but I liked the idea of having some credits generated by devices older than your nieces & nephews (and maybe your boss).
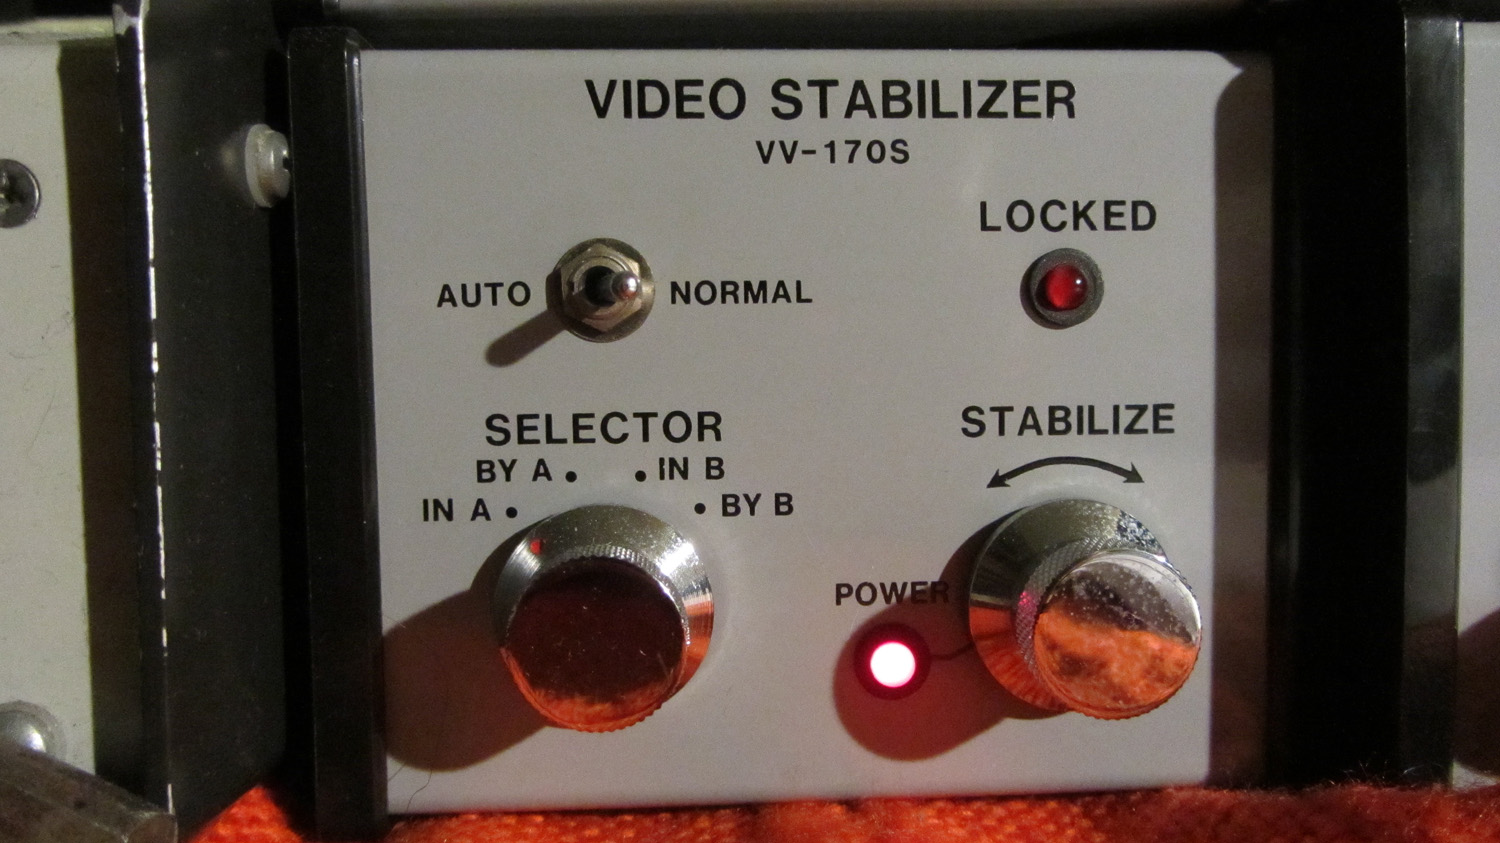
The video feedback is secret voodoo which involves sending video through a series of Video Ventures boxes that control video gain, colour levels (luminosity, colour burst, saturation, and phase), detail, and sync.
.

.
.

.
I’ve a schematic I doodled so I can reproduce it again (ideally), but I think anyone who feeds video through black boxes and dials assorted knobs knows some effects are pure happenstance: whatever you’ve done, you’ve found a sweet spot that allows for some manual control which creates that distortion that looks swell.
Sometimes it disappears, and sometimes you can recreate it without much change, but it’s never a sure thing unless you’ve maybe got a professional video mixer that allows for multiple looping, and myriad knobs to mess up a signal.
Some of these Video Ventures boxes are easily found on Ebay, but the trick is getting them for a fair price and not some insanely inflated amount, because as anyone knows, it’s the shipping from the U.S. to Canada that adds to the sticker price. You really have to want it and have use for it to drop cash for those postage fees which keep shooting upwards every year. Moreover, not every vendor will ship outside of the continental U.S., and I’ve never seen any of these VV boxes for sale in Canada.
Later on I’ll have some demo videos showing what they do, so you know whether they’re worth your while. There were other manufacturers of prosumer and upper-consumer grade boxes, and vintage professional gear is still floating out there. A late eighties /early nineties Time Base Corrector once sold for $3200, but a used model, albeit well-worn by its former owners, can go for less than $50, although it may need calibration, and may lack even S-VHS plugs and just have classic BNC plugs.
I like the VV boxes because they are a little crude, and can dirty and blow out or warp elements within a signal that looks a little too neat when done digitally. The problem I found is when it’s input into a MiniDV recorder, it can’t handle the nasty extremes which tend to offer the most amazing colours, grain, or distortions.
VHS can handle it, as can a DVD recorder (which is a little surprising, but presumably the Toshiba recorder I have was designed to accept dirty VHS footage for archiving. Needless to say, I swear by Toshiba DVD direct-to-disc recorders even though they do use heavier MPEG compression).
.

.
Most of the severe damage I inflicted on the footage that plays under the credits at the end was bounced between these devices, and I treated some layers within Premiere. The chunky, crude, dirty analogue boxes fatten anomalies within the video signal, whereas the digital program allows you to screen through the footage and pick out layers that suit your need, tweaking parts you like.
The video noise that precedes and follows the treated store front (the purple hazy one) in the teaser are clips sent through a Sony SEG-1 mixer which has sync issues, hence the rolling.
.

.
Moreover, parts of the video in the teaser’s end is colour footage that’s force-fed into a B&W mixer (the SEG-1) with levels adjusted until there’s a spontaneous colour burst, which is then further saturated digitally. It’s all mad scientist fiddling, with coax cables and obsolete connectors snaking around my coffee table.
.

.
As for the sound design, I’ll be honest and say most of what you hear (foley excepted) comes from two sources: radio station mush, and maybe a 1 minute chunk of audio of myself and two co-workers renting videos to customers on a Saturday. I created drones, blurred tones, beeps, tones, and other weirdness from that one chunk with Sound Forge and Premiere.
.
.
As for the flickering light chimes, that’s a secret. It does come from a simple source, though; what makes it work is how it was edited, shaped, processed, snipped, paced, and edited into the sound mix that (I think) works pretty good.
Clear inspiration comes from Ben Burtt. When asked where the sound of the giant rolling ball that almost flattens Indiana Jones at the beginning of Raiders of the Lost Ark came from, he admitted it was his old Honda rolling down the driveway; and those bass drones made by the vehicles in the pod race sequence in Star Wars: The Phantom Menace are an electric shaver vibrating under a metal mixing bowl.
From simple sources come amazing discoveries. My Big Head Amusement Logo uses crackling onion skins, and the decelerating clicks of a cold pot placed on a hot stove element. Seriously. That’s all it is. Plus voodoo.
Cheers,
Mark R. Hasan, Editor
Big Head Amusements